I’ve always found the concept of a no-knead bread to be somewhat misleading. Kneading is part of the traditional process of dough fermentation, and its goal is to combine the dough ingredients and allow the water to hydrate the flour. In addition, kneading accelerates fermentation by “slapping around” the flour’s protein in order to speed up the formation of a strong gluten network. What happens in the bowl stays in Vegas or on the work surface creates warmth via friction, which benefits the yeast and oxygenates the flour.
While it’s true that most no-knead recipes don’t require you to spend 15-30 minutes of a Popeye-arms kneading style in order to build gluten strands in your dough, eventually *some* stretching of those gluten strands is needed, even if it’s not technically kneading. If you’ve ever had to hand-mix a bread dough using only a wooden spoon, you know there’s definite physical effort involved in incorporating those ingredients to homogeneity.
Some of this effort can definitely be taken over by some of the sturdier kitchen appliances (love letter to my beloved KitchenAid incoming!). However, this runs the risk of having these machines be a little too efficient and enthusiastically blow past that “sweet spot” of perfectly mixed/kneaded dough to a bowl of broken, flabby, pallid goo that will never hold its shape again. It’s like overwhipping cream; if you go past the point of no return, then you have butter. When you reach the bread goo stage, however, it’s only good for making crackers, or feeding chickens or feral children.
This flavourful yeasted bread recipe is classified as a “no-knead” recipe, and in many respects it is, but as mentioned above it will require some strong wrists and a little patience to get the ingredients to commingle properly at the start of the process. After that part, as long as you can manage to shape the super-sticky dough into a ball, it’s easy sailing.
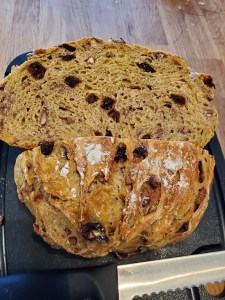
This loaf is quite a chonkyboi when it comes out of the oven, but it has a lovely, slightly moist crumb and is redolent of both pumpkin and spice, but not overpoweringly so. I prefer to use freshly roasted and cooled pie pumpkin puree for this recipe, but a tin of the pure pumpkin puree is absolutely fine too.
Best served slightly warm with some salted butter, honey, or preserves on top, but is delicious any way you want to eat it.

No-Knead Pumpkin Cranberry Pecan Bread
Yield: 1 loaf | Prep time: 20 mins | Resting time: 12-16 hours | Bake time: 50 mins
Special Tools: parchment paper, Dutch oven with lid or similar baking vessel, bakers lame or extremely sharp non-serrated knife
- ½ cup/125g/5fl.oz pumpkin puree (about ½ can)
- ¼ cup/85g/3fl.oz liquid honey
- 1 cup/250g/8oz warm water
- 3 cups/411g/15oz all-purpose flour (can substitute up to 1 cup of whole wheat flour if desired)
- 1¼ tsp/7.5g/0.25oz salt
- ½ tsp/2g/0.1oz instant yeast (not active dry)
- 1 tsp/2g/0.1oz pumpkin pie spice OR a pinch each of cinnamon, allspice, cloves and nutmeg
- ½ cup/70g/2.5oz nuts (I recommend pecans or walnuts), lightly toasted and roughly chopped
- ½ cup/55g/2oz dried cranberries, roughly chopped
- In small bowl, combine pumpkin puree with honey and warm water and mix until smooth. Set aside.
- In larger bowl, whisk flour, salt, yeast and spices together, stir in nuts and cranberries and mix until combined. Pour wet mixture over dry mixture and stir until all of the liquid has been absorbed into the flour. Dough should be smooth and sticky. [Note: I’ll admit to “cheating” a little and kneading the dough in the bowl for a few seconds to ensure it’s all sticking together properly].
- Lightly oil a large bowl and place the dough inside. Cover bowl with plastic wrap and a clean kitchen towel overtop; set aside to proof slowly over the next 12-16 hours (depending on the ambient temperature of your kitchen).
- Scrape dough out of bowl using a silicone scraper or floured hands onto a heavily-floured worktable or large board (the dough should be quite sticky). Dust top with more flour, and using your floured hands gently shape and form into a ball. Place dough ball on a sheet of parchment paper, cover with plastic wrap and a towel, and let it rest for its second rise for 1 hour.
- Meanwhile, preheat oven to 450°F, and set top rack in lower third of oven, and the second rack on the very bottom rung. Place a medium-sized round Dutch oven, cast-iron pot, or similar oven-safe casserole dish with a lid into the oven to preheat, and a plain cookie sheet on the very bottom rack (this will deflect most of the direct heat from the bottom of your pot and help resist burning). 15 minutes after the oven has come to temperature, or after the 1 hour second rest is done (whichever is longer), slash one or more large and fairly deep incisions through the top of the dough; this should help to control oven spring. Remove hot pot from oven, take off lid, and quickly but carefully lift and place the parchment paper containing the risen dough into the hot pot.
- Cover pot and return to oven for 30 minutes covered, then remove lid and bake an additional 15-20 minutes. Remove pot from oven; using the parchment paper, lift the bread out of the pot, and place on a cooling rack to cool completely, about 1 hour.