
I was today years old when I FINALLY successfully made my first batch of homemade baked beans. When I was younger, I thought it would be too challenging for my uncertain skillset to handle; when I was a little older and had since converted to vegetarianism (no preaching here, don’t worry), I couldn’t figure out how to replace the flavour and umami of salt pork with something non-meat-based. The few times I tried over the last few years usually aborted before they ever got into the final bake-off, as the beans were either too hard/old, or smelled funny, or I just lost my confidence and did something else for dinner that day.
I honestly don’t know why it took me so long.
Not only screamingly economical (I estimate that this entire recipe cost me under $3.00CDN; that’s total, not per person!), these beans are super tasty and filling. They’re not pretending to be anything they’re not (like full of pork, or a molasses-smothered Boston baked bean-type recipe); they’re not like any other recipe I’ve tasted.
I started with a simple recipe from the indomitable The Spruce Eats (Vegetarian Boston Baked Beans with Molasses), but tweaked a number of ingredients to suit my tastes and what I had on hand at the time. I think it’s those changes that really makes this recipe unique. It is mine, it is simple (like little old me, hurr durr), and it is delicious. It also happens to be gluten-free and vegan, but those alterations were more by accident than design. The only thing this recipe is not, is quick. You really need to plan out your method a day in advance if you’re going the distance with this recipe, as with virtually any other bean recipe out there, and while there are shortcuts I don’t recommend them. This recipe deserves your full attention, even if most of it is spent scrolling through Netflix titles while waiting for these little beanies to be done.
Don’t worry; it will be worth it. 🙂
Vegetarian Baked Beans
YIELD: 4 servings | PREP: 8-10 mins | SOAK: 12 hours or overnight | COOK: 1 hour | BAKE: 1.5 hours
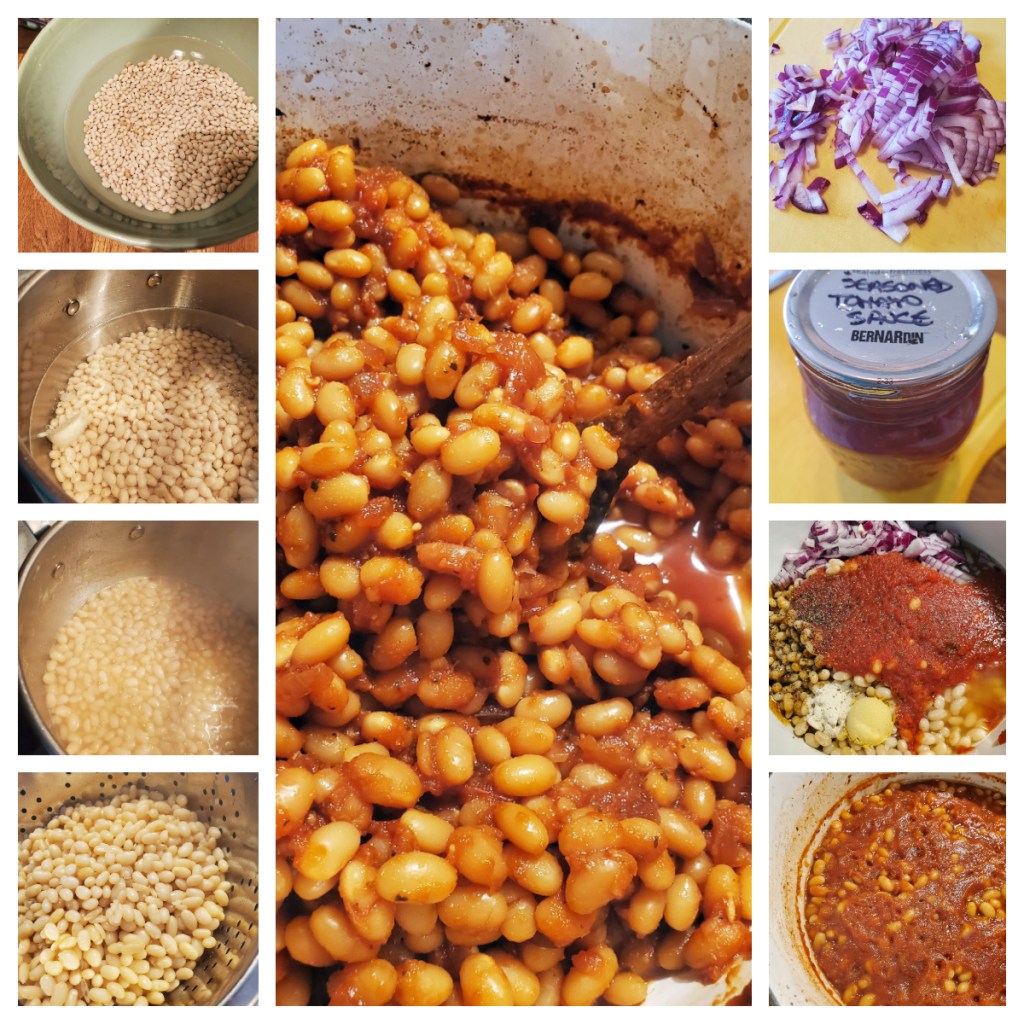
- 2 cups/625g/22oz dried navy beans
- About 6 cups/2.13L/72fl.oz water* – you can replace the stock cube below by using 2 cups of chicken or beef or vegetarian flavoured broth
- 1 bouillon cube (I use a vegetarian beef flavoured stock cube, but you can replace with broth: see above ) – make sure it’s GF if doing gluten-free
- 1 whole garlic clove, peeled
- 1 big pinch kosher salt
- ½ medium onion (white, yellow or red), diced small
- 1 cup/240mL/8fl.oz crushed tomatoes or tomato sauce (NOT pasta sauce!) – I used home-canned seasoned tomato sauce
- 1 cup/240mL/8fl.oz low-sodium vegetable broth
- ½ cups/170g/6oz fancy molasses (use a vegan brand if you need to)
- 1 tbsp/15mL/0.5fl.oz tamari (can use soy sauce if not doing GF)
- 1 tsp/2.1g/0.7oz mustard powder
- ½ tsp/1.7g/0.06 garlic powder
- Cracked black pepper
- 1 tbsp/15g/0.5oz salted butter or olive oil (optional)
- DAY PRIOR: rinse the navy beans in cool, running water to remove any particulate matter; pick through for stones or damaged/blemished beans. Dump rinsed beans in a large bowl with 9 cups of clean, cool water (1:3 ratio of beans:water). Let sit in a cool place (refrigerator or pantry) for about 12-14 hours, or overnight.
- DAY OF, 3 HRS PRIOR: drain the pre-soaked beans and place into a large heavy-bottomed pot; fill with water to 1-inch above the beans. (This is where you can use some stock/broth to replace the water and bouillon cube, if you like.) Place the bouillon cube, pinch of Kosher salt and garlic clove in the pot, and heat on high to boiling; turn down to medium and let cook for 1 hour, stirring periodically.
- DAY OF, 2 HRS PRIOR: Preheat oven to 350°F, and place rack in middle. Make sure whatever casserole or baking crock you will be using for the final cook off of the beans fits in well without being too close to the top elements in the oven.
- Meanwhile, combine the beans, diced onion, tomato sauce, broth, molasses, tamari, mustard powder, garlic powder, and cracked black pepper in a Dutch Oven or other strong oven-safe casserole dish with a well-fitting lid.
- Cover and bake for 90 minutes, checking and stirring every half hour. If by the 60 minute mark the beans are still too liquid for your taste, remove the lid for the last 30 minutes of baking (I ended up keeping my lid cracked the whole way through to better control evaporation).
- Remove from oven and taste for seasoning. You can add a knob of butter or a tablespoon of olive oil at this time for a richer mouth-feel, but it’s not required. Serve hot or lukewarm. Makes great leftovers if it lasts that long!


One Comment Add yours