
While I usually view apples as an autumn harvest fruit, their longevity when they’re stored properly over the winter months means that they’re usually an available crop for ages. Hence why I have received literally DOZENS in my winter/spring organics boxes this past year, and why my kitchen is currently somewhat awash in Fuji, Royal Gala and HoneyCrisp apples at the moment.
I’ve posted several recipes before using apples, such homemade apple sauce and apple butter, an amazing recipe for a most delicious apple butter pumpkin pie, and wrote recipe reviews of Anna Olson‘s Apple-Cranberry Crisp and Twisted‘s Cinnamon Roll Apple Pies, so I wanted to try something different. I’d never made apple chips before, so I started looking for recipes on dried apple slices, or as the Mennonites near our area call them, schnitz. I once read an old recipe book where it mentioned how the Mennonites would thinly slice hundreds of apples at a time, then string the slices onto twine and hang them up in the rafters of their homes where the dry heat rose from their chimneys and dried all the apple slices over a period of weeks.
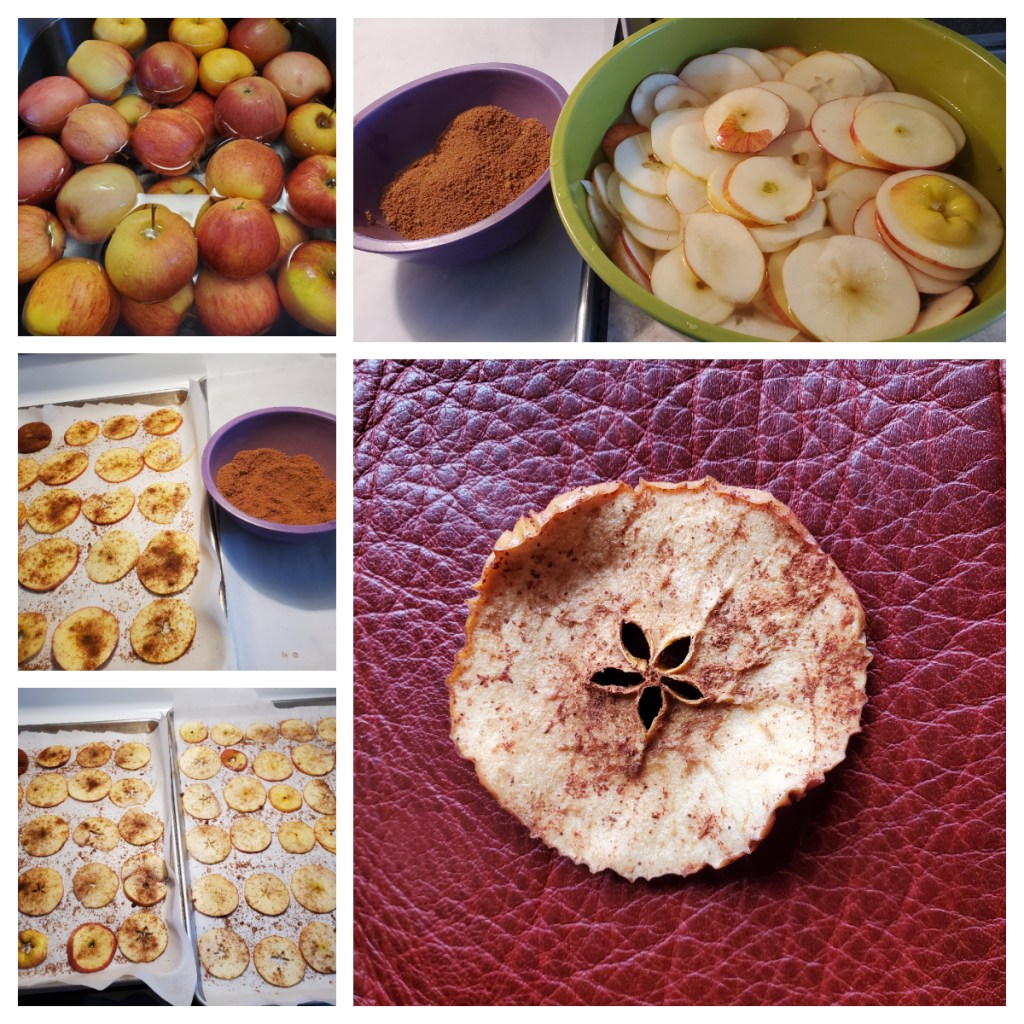
Well, I don’t have that kind of barn-style setup, but at least that homily convinced me that this could be made without an expensive dehydrator, which was what most of the modern recipes I found called for. I also wanted the crispy apple chip style instead of the chewy style that I find comes from thick-cut dehydrator style chips. Happily, my research showed me how incredibly easy these are to make in the oven (instead of rafters), and the best recipes use only a few simple ingredients: apples, sugar, and a warming spice (in my case I used cinnamon). The only annoying thing about this recipe is the time it takes for them to dry; you are effectively using the oven as a large dehydrator; therefore the temperature has to be low and slow.
In my first test, I made too many slices and had to submerge them in some lemon water to prevent browning; this probably made the drying procedure take much longer than it should have. However, learn from my mistakes; I was able to make about 3-4 apples worth of chips in my first test, and that was filling two half-sheet pans and one full sheet pan with a single layer of slices (they can’t be overlapping or they won’t crisp up). Therefore, if you only slice that many at one time you won’t need to keep them from browning, so it may take less time to dry them.

With 3-4 medium-sized apples, this made about 70 apple chips (2 med pans x 20 + 1 lg pan x 30 slices) at one time. And how many do I have today (considering I made this recipe yesterday afternoon?) Glad you asked. I have exactly ONE chip left, and only because my spouse thought to save it for me before SCARFING DOWN THE ENTIRE CONTAINER. Thanks hun.
Needless to say, these are a huge hit in my household, and they probably will be for yours as well; they’re “super tasty” (high praise from my hubby!), healthy, incredibly inexpensive, and most definitely more-ish. And I think it goes without saying (but I’m going to say it anyway) that this recipe is not only vegan but also gluten free and low sodium.
Crispy Cinnamon Apple Chips
YIELD: 70+ slices per batch | PREP: 10 mins | BAKE/COOL: 3.5-4 hours
SPECIAL EQUIPMENT: mandolin (recommended but not required)
- a quantity of medium-sized fresh, firm-fleshed apples (start with 4-6), any variety
- 1 cup light brown or white sugar (I used brown; it’s SO DELICIOUS!)
- 1 tbsp ground cinnamon (can substitute with another preferred baking spice or a mixture of several; try cardamom, nutmeg, allspice, ginger, cloves, apple pie spice, pumpkin pie spice, ground chai spice(!), or anything you can think of that marries well with apple)
- Preheat oven to 200°F/95°C. Prepare as many rimmed baking sheets as will fit into your oven on all racks with parchment paper; set aside.
- Combine sugar and chosen spices in a small bowl; set aside.
- Thoroughly wash and destem apples; with a mandolin or a very sharp chef’s knife, carefully thinly slice unpeeled, uncored apples horizontally (i.e. from the top to the bottom). Try very hard to make all of the slices as thin and as evenly sliced as possible; thick slices will go rubbery and not dry all the way through. Don’t worry about the seeds; they will drop out naturally from the cores for discarding later. The centre seed pockets (known as carpels) taste fine when they are dehydrated, so don’t bother coring them unless you really want to.
- Place apple slices in a single layer on prepared baking sheets; leave a smidgen of space between each slice so they do not stick. Sprinkle sugar spice mixture over one or both sides of each slice (I did both sides), as lightly or as heavily as you wish.
- Place trays in oven and “bake” for 2.5-3.5 hours, flipping the slices and rotating trays at the 90-minute mark. Depending on the thickness of your slices and the lowest temperature you can get your oven will inform how long it will take your apple slices to dry. When they are dried enough (but still slightly bendy), turn off the oven and leave the trays inside for another hour or until your oven is completely cold.
- Store the slices in a Ziploc bag or other air-tight container; if you have foodsafe silica gel packets, this is the time to use them. They will keep for months, if the family doesn’t eat them all before you have the chance to store them!


What a great way to lower waste in the kitchen!
LikeLiked by 1 person
Agreed; I’d thought of the frugality of using the entire apple, but didn’t consider the zero-waste aspect. You’re really just trashing the seeds and the stem!
LikeLike